Your Cart (0)
Your cart is empty
Free express shipping
Drawer menu
Free express shipping

Finding the right approach to transform a bathroom with marble can feel overwhelming, especially when aiming for flawless results in high-end interiors. The allure of marble lies in its luxurious look and timeless appeal, but achieving both beauty and functionality demands careful preparation and expert technique. This guide delivers practical insights for luxury homeowners and interior designers who want to create a stunning sanctuary, starting with meticulous space preparation and progressing through each installation stage.
| Key Point | Explanation |
|---|---|
| 1. Thoroughly Prepare the Bathroom | Ensure levelness, check surfaces, and measure dimensions for a successful marble installation. |
| 2. Careful Unpacking and Inspection | Inspect each marble piece for damage and color consistency to safeguard your investment. |
| 3. Accurate Positioning and Securing | Dry-fit pieces and use proper tools to achieve perfect alignment and spacing during installation. |
| 4. Seal and Protect Surfaces | Apply a high-quality sealer to prevent stains and maintain the beauty of marble surfaces. |
| 5. Final Installation Check | Conduct a thorough inspection to ensure alignment and secure attachment before project completion. |
Installing a marble bathroom set transforms your space into an elegant sanctuary. This critical first step ensures a smooth, professional installation by creating the ideal foundation for your luxurious marble components.
Preparing your bathroom requires meticulous attention to detail. Start by thoroughly evaluating the current space and addressing several key preparation aspects. Bathroom planning guidelines recommend comprehensive pre-installation checks that will set the stage for a stunning marble installation.
Your preparation checklist should include:
Each of these steps helps create a pristine environment that supports the intricate marble installation process. Proper preparation prevents potential complications during the actual marble set placement, ensuring a seamless and professional result.
Attention to detail during space preparation determines the ultimate success of your marble bathroom transformation.
The goal is creating a clean, level, and structurally sound foundation that showcases the natural beauty of your marble bathroom set. By methodically addressing each preparation aspect, you’ll set the stage for a stunning bathroom renovation.
Pro tip: Photograph your bathroom space before beginning the preparation to document the existing conditions and help track your renovation progress.
Unpacking your marble bathroom set requires precision and care to ensure the pristine quality of your luxury investment. This critical step protects your carefully selected marble components from potential damage during the initial handling process.
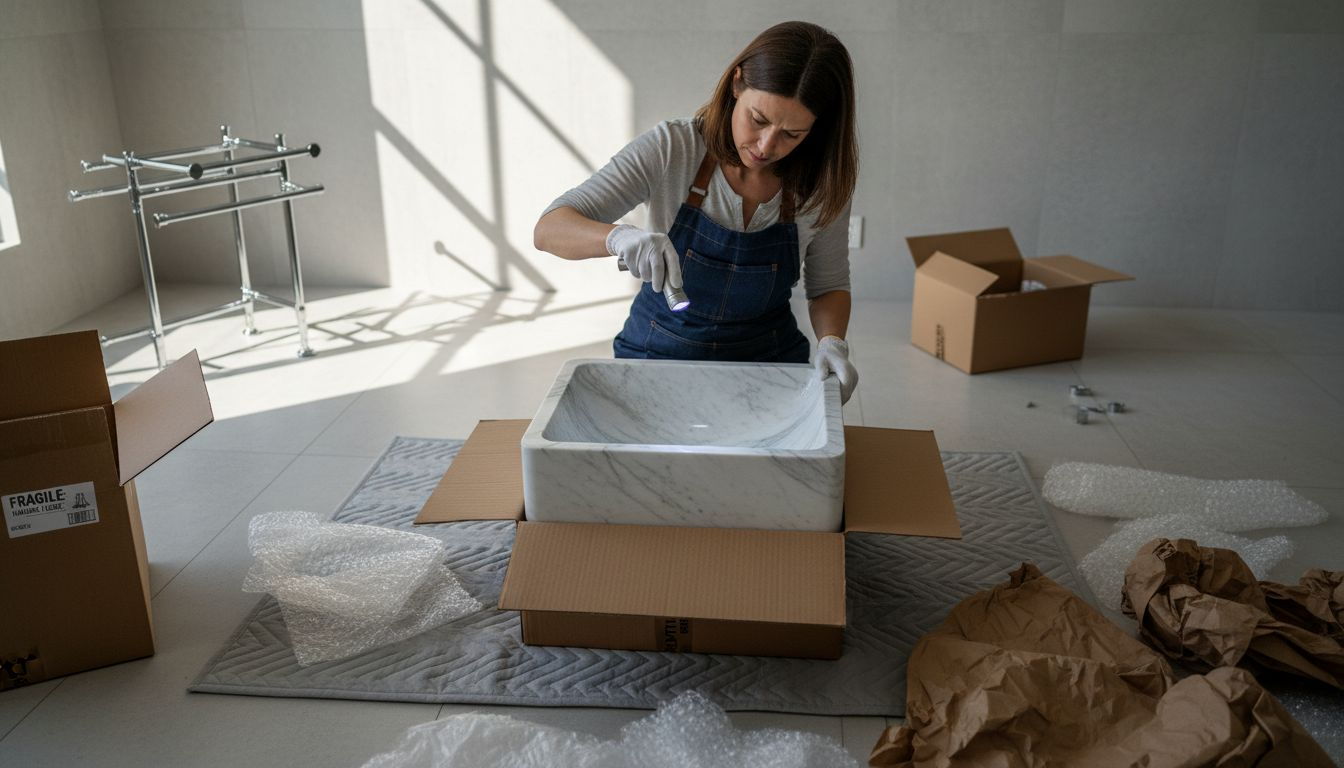
Professional installers recommend meticulous marble inspection techniques that safeguard your investment. Begin by preparing a clean, protected workspace with soft blankets or padded surfaces to prevent accidental scratching or chipping during unpacking.
Your marble inspection checklist should include:
Careful and thorough inspection prevents potential installation complications and ensures your marble bathroom set meets the highest quality standards.
Take your time during this process. Each marble piece represents a significant investment, and identifying potential issues before installation can save considerable time and expense in the long run.
Pro tip: Use white cotton gloves when handling marble to prevent fingerprints and maintain the surface’s pristine appearance.
Positioning and securing your marble bathroom set is a precision task that transforms your design vision into a stunning reality. This critical step requires careful planning and expert technique to ensure your marble pieces are perfectly aligned and securely installed.
Professional installers recommend precise marble positioning techniques that guarantee both aesthetic perfection and structural integrity. Dry-fitting each component before final installation allows you to verify alignment, pattern continuity, and overall visual harmony.
Your marble positioning and securing strategy should include:
Mechanical precision and careful positioning are the hallmarks of a professional-grade marble bathroom installation.
Take time to understand the unique characteristics of each marble piece. The natural variations in color and veining mean that each component requires individual attention to create a cohesive and elegant final design.
Pro tip: Work in small sections and allow adequate curing time between piece placements to maintain optimal adhesion and prevent shifting.
Sealing your marble bathroom surfaces is the final crucial step in preserving the luxurious beauty and longevity of your investment. This process creates an invisible protective barrier that shields your marble from potential stains, moisture damage, and daily wear and tear.

Professional preservationists recommend comprehensive marble surface protection using specialized impregnating sealers designed specifically for natural stone. These advanced sealers provide critical defense against potential damage while maintaining the marble’s natural luminosity and intricate visual characteristics.
Your marble sealing strategy should include:
Proper sealing transforms your marble from a beautiful surface into a protected, long-lasting design element.
Remember that different marble types may require slightly different sealing approaches. Take time to understand the specific characteristics of your marble bathroom set and choose a sealer that complements its unique properties.
Pro tip: Test your chosen sealer on a small, inconspicuous area first to ensure compatibility and desired finish.
Here’s a summary of common mistakes to avoid when installing a marble bathroom set:
| Mistake | Impact on Final Result | How to Avoid |
|---|---|---|
| Skipping surface checks | Uneven marble placement, instability | Always verify level and soundness |
| Rushing unpacking | Chips or cracks go unreported | Inspect every piece carefully |
| Wrong adhesive choice | Weak bonding or stains | Use marble-specific adhesive |
| Not allowing curing | Pieces may shift or loosen | Follow manufacturer’s timing |
| Skipping sealing test | Sealer discoloration or residue | Test in a hidden area first |
The final installation check represents your last opportunity to ensure your marble bathroom set meets the highest standards of luxury and craftsmanship. This critical quality control step transforms your meticulous work into a flawless, professional-grade installation.
Professional installers emphasize comprehensive marble installation verification as the ultimate safeguard for your investment. A systematic approach allows you to catch and correct any potential issues before declaring the project complete.
Your final installation checklist should include:
Precision during the final inspection separates exceptional installations from ordinary ones.
Take your time during this review. Each careful examination ensures that your marble bathroom set will not only look stunning today but maintain its elegant appearance for years to come.
Pro tip: Use natural side lighting to help reveal any subtle imperfections that might be missed under standard overhead illumination.
Below is a quick reference for essential tools used throughout each installation stage:
| Stage | Essential Tool | Primary Purpose |
|---|---|---|
| Preparation | Spirit level | Check floor and wall level |
| Unpacking & Inspection | Soft gloves | Prevent fingerprints |
| Positioning & Securing | Tile spacers | Ensure proper piece spacing |
| Sealing & Protecting | Applicator pad or brush | Apply sealer evenly |
| Final Installation Check | Side lighting | Reveal surface imperfections |
Transforming your bathroom into a luxurious retreat starts with flawless installation and premium materials. This guide highlights key challenges in marble bathroom set installation like meticulous surface preparation, precise positioning, and protective sealing. Avoid common pitfalls and embrace craftsmanship to showcase the timeless beauty of natural stone.
At Marmorique, we understand the emotional value of your investment and the desire for perfect results. Explore our curated collection of Bathroom sets – Marmorique designed to meet the highest standards of elegance and durability. Each piece is crafted to simplify installation challenges while delivering lasting glamour.

Ready to bring your marble bathroom vision to life with confidence? Discover expert solutions and premium products at Marmorique. Complement your bathroom set with carefully selected Marble Bathroom Essentials – Marmorique and Mirrors – Marmorique to complete your sophisticated space today.
To prepare your bathroom space, you need to ensure it is clean and level. Verify floor levelness, inspect wall surfaces for damage, check plumbing connections, and measure the installation area carefully.
When unpacking your marble bathroom set, handle each piece with care to avoid damage. Inspect for any cracks or chips and verify that each piece matches your ordered dimensions and color consistency.
To position and secure your marble bathroom set, dry-fit all pieces first to ensure alignment and spacing. Use professional-grade leveling tools and marble-specific adhesives to secure each component carefully.
Seal your marble surfaces with a high-quality, marble-specific sealer to protect against stains and moisture. Clean the surfaces thoroughly before applying the sealer evenly, following the manufacturer’s recommended curing times.
During your final installation check, inspect every marble piece for alignment and check the consistency of grout lines. Ensure all components are securely attached and that surfaces are free of scratches or adhesive residue.
Avoid skipping surface checks, rushing through unpacking, and using the wrong adhesives. Take the time to verify levelness and thoroughly inspect each piece to ensure a professional-quality installation.


